Why the Moka Pot Rewards Careful Timing
Why did a brewer designed for the home become so easy to overheat?
The answer sits in the moka pot’s compact construction. Its metal body absorbs stove heat quickly, while the sealed lower chamber builds enough vapor pressure to push hot water through the coffee basket. Once that process starts, it can gather speed in a hurry. Leave the pot unattended and a calm stream can turn into a harsh sputter before the toast is done.
The design grew from Italian home coffee culture, where it offered a practical way to make concentrated coffee without café equipment. A lower chamber holds the water, a funnel-shaped basket holds the grounds, and an upper chamber collects the finished brew. Vapor pressure does the lifting.
Moka coffee remains distinct from pump-driven espresso. The stovetop brewer works at considerably lower pressure, producing a strong, textured cup with its own weight and character. That difference matters because techniques borrowed from espresso, especially a powdery grind and firm tamp, can obstruct the moka pot’s gentler flow.
Watch The Pace
The brewer gives useful signals throughout extraction. Careful timing means noticing them before the final sputter announces that the useful part of the brew has passed.
Prepare the Pot, Water, and Coffee Before Heating
A smooth moka routine begins before the pot reaches the stove. Set out a clean brewer, fresh coffee, a burr grinder if one is available, a kettle, a dry towel, and a compatible heat source. Having everything within reach counts for a lot once hot water enters the lower chamber.
Let the Basket Set the Dose
A moka pot’s stated size determines its practical capacity. The brewer expects its basket and water chamber to work together, so the basket provides a more dependable dosing guide than a universal coffee weight. Fill it consistently for that specific pot rather than trying to force a recipe developed for another model.
The most useful preparation change is to heat the water separately. Starting with cold water appears convenient, but it keeps the grounds and metal over the stove longer before coffee begins to emerge. Freshly heated water shortens that wait and gives the brewer less time to bake the dry coffee.
I treat the kettle as the first heat control, not as an optional extra. Pour carefully, because the lower chamber becomes hot at once. Hold it with a dry towel while inserting the basket and tightening the upper chamber. The seal should be secure, though there is no need to wrench the two halves together.
Hot-Chamber Grip
Arrange the towel before pouring. Reaching across the counter for it while holding a heated aluminum chamber turns a calm routine into an awkward one.
Fill the Water Chamber and Basket Without Tamping
How full should the lower chamber be? Use the brewer’s permitted fill level, generally keeping the water below the safety valve. The valve must remain uncovered and unobstructed.
Next, set the funnel basket into the chamber and add medium-fine coffee. A texture resembling table salt offers a sensible starting point: finer than a typical filter grind, yet less powdery than coffee prepared for an espresso machine. The grounds should create enough resistance to support an even extraction while still allowing water to travel upward.
Level the Bed Gently
Distribute the coffee across the basket and leave a slim margin beneath the rim so the grounds have room to expand when wet. Run a finger or a flat edge lightly across the surface. Brush loose grounds from the basket lip and threaded rim, where they can interfere with the seal.
Skip the tamper. Compression can choke the flow in a brewer that relies on modest vapor pressure. If the coffee piles unevenly, tap the side of the basket lightly and level it again rather than pressing downward.
For a beginner, grind consistency matters more than achieving a visually perfect surface. With practice, small grind adjustments can refine the cup. Hold the other variables steady while making those changes, or the cause of an improvement becomes difficult to identify.
Use Gentle Heat and Stop Before the Final Sputter
Place the assembled pot over low to medium heat. On a gas stove, keep the flame under the base rather than letting it curl around the sides. Induction cooking depends on both the pot’s construction and the cooktop, so check compatibility before assuming the brewer will respond.
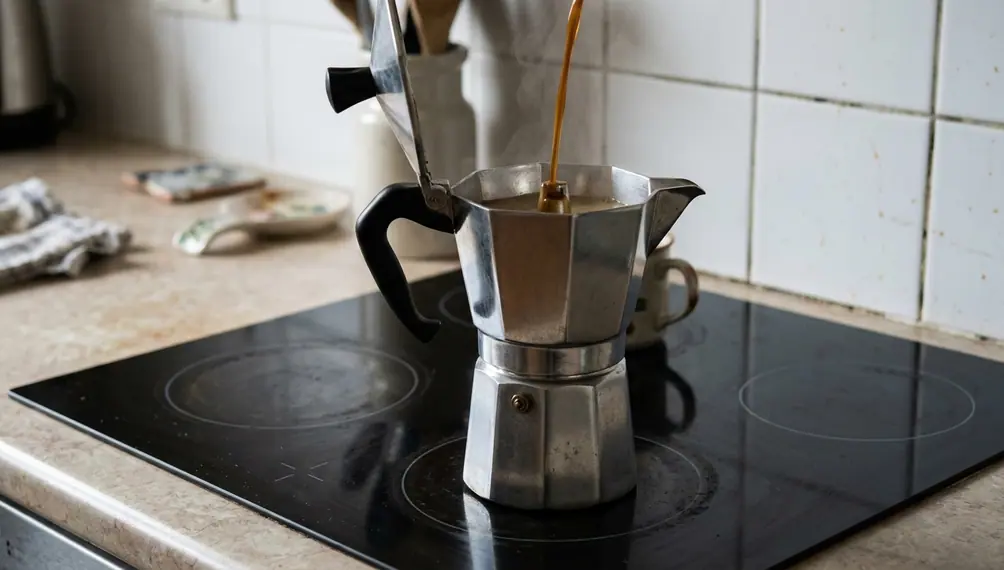
Then listen. Early heating is quiet. Coffee eventually enters the upper chamber as a dark, viscous stream, ideally steady rather than explosive. As extraction continues, the liquid moves faster and becomes thinner.
Pull the Pot as the Stream Pales
For medium and light roasts, the clearest stopping cue is the visual transition from viscous dark syrup to a translucent honey-blonde flow. Remove the pot from the burner as that pale stage develops, before steam drives the coffee into a violent sputter.
Dark roasts demand a slightly different reading. Their stream may retain a deeper color until sputtering is close, which makes sound more useful than color. A soft bubbling note signals the end approaching. Lift the brewer promptly.
To halt extraction more decisively, cool the outside of the lower chamber briefly under cold tap water. This drops the steam pressure and prevents the remaining heat from forcing a bitter final surge through the grounds.
The Better Finish
The last sputtering liquid rarely improves the cup. Removing the pot while the stream still looks composed preserves more sweetness and reduces the dry, scorched finish associated with excessive heat.
Correct Burnt, Metallic, Weak, or Sputtering Brews
Troubleshooting works best when the cup result is matched to something visible or audible during brewing. Change one variable at a time, brew again, and leave the water level and basket dose untouched.
When the Coffee Tastes Burnt
Sharp bitterness usually points toward too much heat, a late stop, or a grind that restricts flow. Lower the burner, remove the pot as the stream begins to pale, or move the grind slightly coarser. If coffee races into the upper chamber and sputters almost immediately, reduce the heat first.
When the Cup Tastes Metallic
Inspect the brewer before changing the recipe. Oxidized coffee oil residue on the aluminum filter screen can produce flavors that resemble an extraction fault. Check the screen, funnel, gasket area, and upper chamber for old deposits, then clean the parts according to the pot maker’s directions and dry them thoroughly.
Water can also affect the cup. If cleaning makes no difference, brew with a different familiar water source before altering the grind. This comparison separates a water issue from a mechanical or coffee-related one.
When the Brew Is Weak
Start with the coffee itself. An overly coarse grind allows water through with too little resistance, while an underfilled basket changes the bed the brewer was designed to use. Bean freshness also shapes aroma and perceived strength.
Watch the upper chamber during the next attempt. Removing the pot very early may leave too little brewed coffee to create a balanced cup. Let the steady dark flow develop, then stop when it begins to thin and pale.
When the Pot Sputters Early
Early sputtering calls for a physical check. Make sure the basket and filter path are clear, the rim is free of grounds, and the pot is assembled evenly. A powdery grind or compressed bed can restrict upward flow. Excessive stove heat can create the same noisy symptom, so adjust the burner only after checking the basket.
Turn the Moka Pot Method Into a Morning Routine
The easiest routine to remember follows the brewer from bottom to top:
- Heat fresh water in the kettle.
- Fill the lower chamber below the safety valve.
- Add medium-fine coffee and level it without tamping.
- Assemble the hot chamber safely with a dry towel.
- Apply gentle, centered heat.
- Watch for a steady dark stream entering the upper chamber.
- Lift the pot as the flow pales or the bubbling sound changes.
- Cool the lower chamber if needed, then pour promptly.
Consistency makes refinement easier. Keep the water level and basket fill stable from morning to morning. If the stream runs too quickly, adjust the grind slightly finer or reduce the heat. If it labors and sputters, move coarser or use gentler heat. Change one control, then taste.
A little after seven in a small apartment kitchen, a home brewer hears the first soft bubbling beneath the kettle’s fading hiss. The dark stream begins to lighten. One hand closes around a folded towel, the pot leaves the burner before the sputter, and a rich, steady cup reaches the mug without a burnt finish.