
What Makes Milk Work in Your Favorite Café Drink?
Which milk will give your favorite home café drink the texture and flavor you actually want?
The answer rarely comes from tasting it cold. A milk can seem smooth and pleasant straight from the carton, then turn thin, overpower the coffee, or separate once heat and steam enter the picture. Thermal stress changes the way proteins, fats, oils, and stabilizers hold together. That heated performance matters more than the first sip from the refrigerator.
Start with the drink. A flat white needs integrated, fluid foam. A cappuccino can carry more air. An iced latte puts greater emphasis on flavor and body because no steaming step softens the edges.
A dependable decision sequence keeps the process manageable: choose milk for the drink, store it correctly, control the heat, and adjust the frothing method. Change one variable at a time. If you switch the milk, starting temperature, and wand position together, the finished cup tells you very little about what helped.
The Heated-Milk Test
Judge a new carton in coffee before buying several. Look for stable texture, a flavor that supports the roast, and foam that remains cohesive through the first few sips.
Choose Milk by Body, Flavor, and Foam
Whole dairy milk brings a round body and usually develops elastic, glossy foam. It suits lattes, cappuccinos, and flat whites where sweetness and weight are welcome. Lower-fat dairy produces a lighter cup and can feel less plush, which may work well when you want the coffee to remain prominent.
Lactose-free dairy deserves its own tasting trial. It often reads as distinctly sweet in the cup, so pairing it with an already sweet or deeply roasted coffee can push the drink farther in that direction.
How plant milks shape the cup
Oat milk often settles comfortably beside cereal, toasted, and caramel-like coffee notes. Soy can build substantial foam, helped by its higher protein content relative to common almond milk. Almond introduces a recognizable nuttiness. Coconut tends to announce itself quickly and may become the main flavor in a delicate coffee.
The ingredient named on the front of the carton tells only part of the story. Protein, fat, added oils, stabilizers, and the overall formulation influence how a plant milk stretches and holds foam. Two oat milks can behave quite differently, especially when one has been formulated for café use.
| Milk type | Useful for | Foam tendency | Cup character |
|---|---|---|---|
| Whole dairy | Lattes, cappuccinos, flat whites | Elastic and glossy | Sweet, round, rich |
| Lower-fat dairy | Lighter milk drinks | Airy with less weight | Clean and light |
| Lactose-free dairy | Sweet-leaning lattes | Varies by product | Distinctly sweet |
| Barista-style oat | Lattes and iced coffee | Dense and creamy | Cereal and caramel notes |
| Soy | Cappuccinos and larger milk drinks | Substantial foam | Full and recognizable |
| Almond | Nut-forward drinks | Often lighter | Toasty and nutty |
Heavy cream illustrates why fat alone is a poor selection rule. Its weight can cover the delicate acidity of a lighter roast. Match richness to the coffee rather than automatically reaching for the highest-fat option.
Keep Milk Cold, Fresh, and Ready to Froth
Cold milk gives you a longer window to introduce air and build circulation before the drink becomes too hot. A clean, chilled pitcher extends that control and makes repeated practice easier.
Storage instructions vary between refrigerated cartons and shelf-stable packages. Follow the package directions for refrigeration after opening and the stated discard point. Barista-style plant milk can still lose flavor or foaming reliability as an opened carton sits, even when it smells acceptable.
A short routine after every pour
- Pour only what the drink requires.
- Close the cap promptly.
- Return the carton to the coldest suitable part of the refrigerator.
- Avoid drinking directly from the container.
- Shake plant milk when the package instructs you to do so.
- Rinse the pitcher before residue dries along the sides.
Separation inside a plant-milk carton can be normal. A brief shake redistributes settled ingredients and helps each steaming attempt begin with the same formulation.
Heat and Froth Milk Without Losing Sweetness or Texture
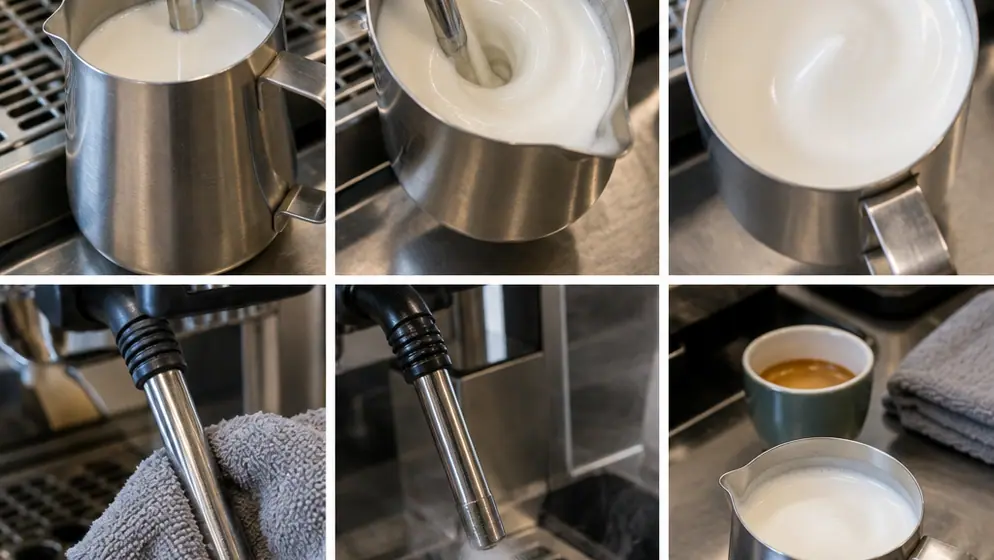
Steaming has two jobs. First, introduce air while the milk is cold. Then create rolling circulation that breaks larger bubbles into a fine, cohesive texture.
I use the sound as an early checkpoint: gentle paper-tearing suggests controlled aeration, while loud sputtering usually means the steam tip has risen too far above the surface.
The espresso-machine sequence
- Purge the wand. Release residual water before placing the tip in the pitcher.
- Set the tip near the surface. Position it just below the milk so air enters gently.
- Aerate early. Keep this phase brief for a flatter drink and slightly longer for a foam-forward cappuccino.
- Lower the tip. Submerge it a little farther and angle the pitcher until the milk rolls in a smooth whirlpool.
- Stop before scalding. End steaming while the milk still smells sweet and looks glossy.
- Clean immediately. Wipe the wand with a dedicated damp cloth, then purge it again.
The visual target resembles wet paint: shiny, cohesive, and fluid enough to pour as one mixture. A rigid cap of dry bubbles will sit on top of the coffee instead of joining it.
Plant-based emulsifiers can weaken under excessive heat. Sensory cues are useful here. Stop when the pitcher is thoroughly hot, the surface remains reflective, and no cooked or overheated smell has appeared.
Match the Frothing Tool to Your Budget and Routine
Do you need an espresso machine to make a satisfying milk drink? No. The right choice depends on whether you value low cost, speed, or close control over texture.
Jar and French press
A tightly sealed jar can add air through shaking, though the result usually separates into liquid and a stiff foam layer. A French press offers more control: warm the milk, pour it into the press, and work the plunger rapidly until the volume expands. Follow with a firm swirl to combine the layers.
These methods suit casual cappuccinos and cocoa-style drinks. They struggle to produce the integrated microfoam needed for detailed latte-art pouring.
Handheld whisk
A battery whisk is compact, inexpensive, and useful for mixing powders or syrups into milk. Keep the head near the surface only briefly, then lower it to circulate the milk. Holding it at the top for too long creates large bubbles and a spoonable cap.
Automatic frother
An automatic frother fits a busy breakfast routine. Fill it, select the cycle, and prepare coffee while it runs. Preset heating and aeration make results repeatable, though many machines allow little control over how much air enters or how fluid the final foam remains.
An espresso steam wand requires more practice and cleanup. In return, it provides direct control over aeration and the vortex, which matters when glossy texture and precise pouring are the goal.
Fix Thin Foam, Large Bubbles, and Separated Milk
Troubleshooting works fastest when each test changes a single condition. Keep the milk brand, quantity, and starting temperature steady while adjusting wand depth. On the next attempt, hold the wand position steady and compare a different carton.
Thin foam that disappears quickly
- Begin with colder milk and a chilled pitcher.
- Move the steam tip slightly closer to the surface during early aeration.
- Try a formulation designed for foaming if the current milk repeatedly stays flat.
Large bubbles across the surface
- Shorten the aggressive aeration phase.
- Hold the tip at a steadier depth instead of chasing the rising milk.
- Spend more time creating strong, even circulation.
- Swirl the finished pitcher and tap out isolated surface bubbles.
Stiff foam that must be spooned
Incorporate less air at the start. Lower the wand sooner and let the rolling motion fold the foam into the liquid. The finished milk should leave the pitcher in a continuous stream.
Plant milk that separates in coffee
Highly acidic coffee can cause some plant milks to coagulate soon after pouring. Test a gentler roast pairing, avoid overheating the milk, and pour promptly after swirling. If separation repeats under the same conditions, compare a different formulation while leaving the brewing recipe unchanged.
One-Variable Rule
Write down the milk, starting condition, aeration approach, and visible result. Change only one item for the next cup.
A Complete Oat Latte Routine to Copy at Home
This routine uses refrigerated barista-style oat milk, an espresso machine with a steam wand, a clean stainless-steel pitcher, and a pre-warmed cup.
- Prepare the cup. Warm it with hot water, then empty and dry it before brewing.
- Ready the oat milk. Shake the carton if directed. Pour enough cold milk for one drink, keeping the level below the pitcher’s interior spout indent so the liquid has room to expand.
- Brew the espresso. Place it in the warm cup and move directly to steaming.
- Purge the wand. Clear residual water into the drip tray.
- Introduce air gently. Place the tip just beneath the surface. Listen for a soft tearing sound and keep the pitcher steady.
- Build the whirlpool. Lower the tip slightly and angle the pitcher until the milk rotates from top to bottom. Continue until large bubbles disappear and the surface develops a uniform gloss.
- Stop on the sensory cue. Finish before the oat milk develops an overheated smell or loses its shine.
- Reset the wand. Wipe it immediately and purge it once more.
- Polish the milk. Swirl the pitcher firmly on the counter. Tap once if an isolated bubble remains, then swirl again until the milk moves as a single fluid mixture.
- Pour without waiting. Begin in the center of the espresso from slightly above the cup. As the cup fills, bring the pitcher closer and move the stream outward, finishing with the last glossy ribbon of oat foam across the surface.