When One Small Choice Changes an AeroPress Cup
The setup looks right: fresh coffee, a clean AeroPress, water just off the boil. Then the first sip lands sharp and thin. At a kitchen counter early in the morning, that result can make the brewer feel more mysterious than its compact plastic parts suggest.
Small changes carry unusual weight in an AeroPress. A finer grind, hotter water, longer steep, or forceful press can move the flavor noticeably. The equipment may be working perfectly while the recipe drifts from one morning to the next.
The useful response is to give every major variable a clear starting point. The method below fixes the coffee dose, water amount, temperature range, steep, and pressing time. It also builds in sensory checkpoints, so a sharp, bitter, weak, or overly intense cup tells you what to change next—one adjustment at a time.
The AeroPress Setup and Starting Recipe
Gather a Stable Brewing Kit
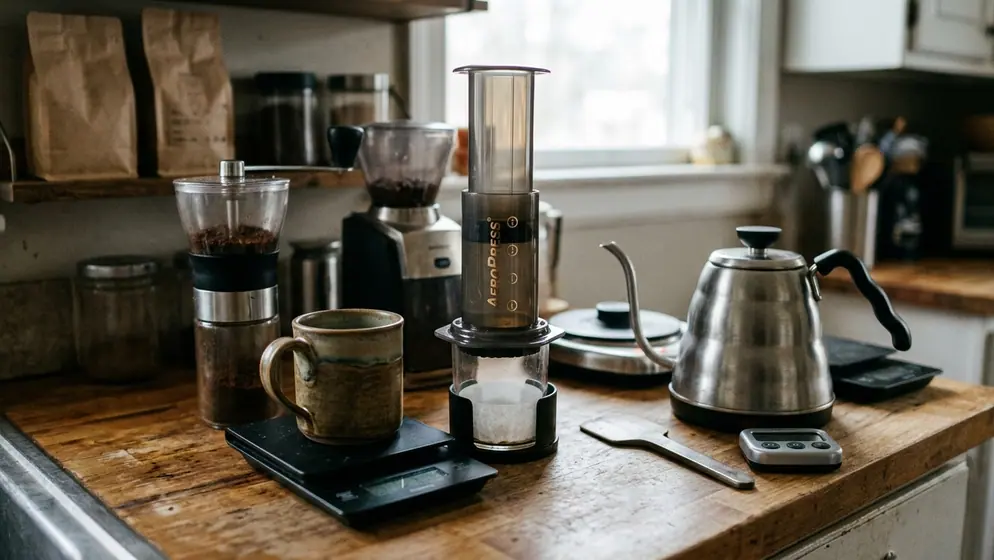
Set out an AeroPress, one paper filter, a sturdy mug, kettle, grinder, timer, and stirrer. A digital scale makes the process easier to repeat because it measures both coffee and water directly.
Use the standard upright orientation, with the filter cap secured and the chamber resting on the mug. The upright position gives beginners a stable platform and avoids the spill risk created when an inverted chamber must be flipped. Place the mug on a dry, level counter before adding hot water.
Start With a Fixed Baseline
- Coffee: 15 grams
- Water: 240 grams
- Grind: medium-fine
- Water temperature: 85–90°C
- Steep: 90 seconds
- Press: approximately 30 seconds
I treat these figures as an editorial baseline: specific enough to diagnose a cup, yet easy to adapt to a different roast, grinder, water supply, or flavor preference.
Set the Grind, Water, and Coffee Dose First
Begin with the grind. Medium-fine coffee should look finer than a typical drip grind and coarser than espresso, with a texture close to table salt. That visible reference travels better between grinders than a dial number, since the same setting can produce different results on different machines.
Weigh 15 grams of coffee, then tare the scale before pouring 240 grams of water. Scoops introduce variation because bean size and roast influence how much coffee fits into a given volume. A scale leaves you with a recipe you can reproduce tomorrow.
Choose Water Temperature by Roast
The 85–90°C range offers a practical home café starting point. Hotter water generally extracts coffee more readily. Moving toward the cooler end can soften bitterness in a darker roast.
Without a temperature-controlled kettle, let freshly boiled water rest off the heat for 45 to 60 seconds. Keep the rest time consistent for several brews before deciding whether temperature needs adjustment.
Brew the AeroPress Cup in a Clear Sequence
Once the ingredients are measured, the brewing sequence should feel calm and compact. A continuous pour preserves heat in the chamber and removes the need for a complicated multi-stage ritual.
- Prepare the filter. Fit one paper filter into the cap. Rinse it if desired, discard the rinse water, and attach the cap securely.
- Seat the brewer. Place the upright AeroPress squarely over a sturdy mug. Check that the mug and chamber feel stable before continuing.
- Add the coffee. Tip in 15 grams of medium-fine grounds. Give the chamber a gentle shake to level the bed; do not tamp or compress it.
- Start the timer and pour. Add 240 grams of water in one even motion over 12 to 15 seconds. Aim for full, steady saturation without an extended pause.
- Stir gently. Give the slurry a brief, controlled stir so dry pockets do not remain along the chamber wall.
- Insert the plunger. Set it into the top of the chamber to reduce dripping, then allow the coffee to steep until the timer reaches 1 minute 30 seconds.
Watch the coffee bed during the pour. Grounds clinging high and dry on one side suggest an uneven pour; aggressive stirring can create its own inconsistency. A centered pour followed by a gentle stir is enough for this everyday recipe.
Press Smoothly, Serve, and Clear the Coffee Puck
At 1:30, place one hand on the plunger and use gentle forearm weight. The descent should take about 30 seconds. Steady, moderate pressure keeps the press controlled; forcing the plunger when resistance rises can make the brewer unstable.
Stop at the hiss or just before it, leaving the plunger roughly 2 to 3 millimeters above the coffee bed. Treat that sound as a repeatable cue rather than a universal flavor law. A reusable metal disc changes resistance and may mute the hiss that a paper filter produces.
Finish the Cup Evenly
Lift the AeroPress off the mug before serving. Swirl the mug or stir the finished coffee so its concentration is even from the first sip to the last.
For cleanup, remove the cap over a bin or compost container and press out the puck. Rinse the seal and filter cap once the brewer is cool enough to handle comfortably.
Adjust an AeroPress Cup Without Losing the Recipe
Change the next brew according to the flavor in the mug. Keep the original recipe visible and alter one variable per attempt. That discipline makes the result useful instead of turning each cup into a fresh guess.
When the Cup Tastes Sharp or Sour
A sharp, sour cup often points toward coffee that needs easier extraction. Raise the water temperature by 2 to 3°C on the next brew while keeping the dose, water, and timing fixed. If the sharpness remains, move the grind slightly finer in a later brew.
When Bitterness Takes Over
For a bitter or drying cup, shift the water temperature down by 2 to 3°C. A darker roast often benefits from the cooler end of the starting range. If temperature does not settle the cup, make the grind slightly coarser next time while preserving the 90-second steep.
When Strength Is the Real Problem
Strength describes concentration in the cup; extraction describes what the water removed from the grounds. Confusing the two can send a brewer toward a much finer grind when the simpler answer is a dose or water change.
For a stronger cup, increase the coffee dose by 1.5 to 2 grams or use less brewing water. For a lighter cup, reduce the dose by the same increment. You can also keep the 15-gram extraction intact and add 15 to 20 grams of hot water to the finished coffee. This post-brew dilution softens an intense cup immediately without discarding it.
Use dilution when the flavor itself is balanced but concentrated. Adjust temperature or grind when the cup tastes sour, bitter, or drying.
Copy This Complete Everyday AeroPress Brew
Here is the full two-minute method in one place. Set an upright AeroPress on a sturdy mug and gather a scale, timer, stirrer, one paper filter, 15 grams of medium-fine coffee, and 240 grams of water at 88°C.
The Two-Minute Walkthrough
- Fit the paper filter into the cap, rinse it if desired, and secure the cap to the chamber.
- Place the AeroPress upright on the mug. Add 15 grams of coffee and shake gently to level the grounds.
- Tare the scale. Start the timer as the water first touches the coffee.
- Pour continuously to 240 grams over 12 to 15 seconds.
- Stir gently, then insert the plunger just far enough to form a seal.
- Leave the coffee to steep until the timer reads 1:30.
- Press with steady forearm pressure for 30 seconds, stopping at or just before the hiss. The timer should reach 2:00 as the press ends.
- Remove the AeroPress from the mug and swirl the coffee.
- Taste. If the flavor is balanced but too intense, add 15 grams of hot water, swirl again, and take a second sip. Add the remaining 5 grams only if the cup still needs dilution.
Write the brew down the way it happened. A Tuesday morning log might read: 15 grams coffee, 240 grams brew water, 88°C, medium-fine grind, 1:30 steep, 30-second press, 15 grams of post-brew water — cup still a little sharp. Wednesday, that same sheet changes exactly one line: 90°C instead of 88, everything else untouched. If the sharpness drops away, the temperature was the culprit and the recipe is settled; if it stays, the grind is the next thing to move, and the log already tells you where to start.